 On this day in 1941 the RAN sloop HMAS Parramatta (II) was on her first Tobruk run when she and the convoy she was escorting came under attack at 5:30pm. Parramatta commanded by LCDR Jefferson Walker sighted three formations each of 16 dive bombers manoeuvring to attack.
The escorts opened the heaviest anti aircraft fire they could muster. The bombers came in and the sloop HMS Auckland was hit in the stern and disappeared from view in a cloud of smoke. She emerged out of control, guns still firing, and heading straight for Parramatta which had to swing away to avoid a collision. ‘As she passed’, wrote Walker, ‘I saw that she was an utter wreck abaft the mainmast, with no stern visible.’
Miraculously both Parramatta and the petrol carrier merchantman had escaped damage. Auckland, stopped and listing heavily to port, crew began to abandon ship and Walker closed her to begin the work of rescuing her crew still onboard. She was barely cleared of crew when a heavy internal explosion broke her back.
At 6:30pm the enemy returned, machine gunning Auckland’s survivors drifting in their lifebelts. Parramatta was forced to withdraw to gain sea room until darkness fell. For two hours the bombers kept coming so that according to Walker ‘there seemed always one formation diving in succession, one moving forward into position and one splitting off and coming in at 45 degrees.’
But at last after the enemy had failed to sink either Parramatta or her charge the attacks ceased ‘Walker turned his ship towards the scene of Auckland’s loss. There she was joined by the HMAS Waterhen and HMAS Vendetta. They rescued 164 Royal Navy sailors and took them to Alexandria.
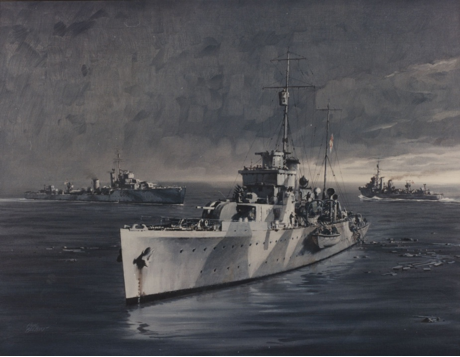
(Painting by Phil Belbin of HMA Sloops Parramatta, Waterhen and Vendetta on the Tobruk Ferry run 1941.)